Welcome to my new coding blog!
As the first blog post I thought it was only appropriate to explain step-by-step how I made my own website/blog and hosted it using GitHub’s free hosting service, GitHub Pages, for free!

What is GitHub Pages?
GitHub Pages is a free hosting service that allows GitHub users to create and host their own unique website for free! Files are taken straight from your repository on GitHub and deployed automatically whenever you push to the repo
Why should you use GitHub Pages? (compared to other hosting platforms)
- First of all, its FREE
Any person familiar to hosting applications and websites should know what a nightmare it is to host their site online cheaply or for free. - Secondly, its EASY
It is not an exaggeration to say that you can make a basic website on GitHub pages in minutes. The ease of use is incredible. But you may experience some hiccups when you first get started, so I’m here to make it just a bit easier for you :) - Last but not least, it is connected directly to your GitHub account
Programmers and coding enthusiasts would be glad to know that everything is integrated to your GitHub account. Your website is automatically updated whenever you push to your repository :D - And many other features I have yet to discover!
The step-by-step guide to making your own website
There are multiple ways in which you can start your own GitHub Pages site. However for this blog I will be going through the bare basics on how to
- Create a bare-bones website
- Add a simple Jekyll theme
Some things to note
If you will be editing your website on a local computer code editor such as vscode, you might want to download all the necessary libraries and plugins, to your computer, to avoid any issues when using themes and other GitHub Pages extensions.
These include: Ruby, Bundler, Jekyll, GitHub Pages Gem
1. Create a bare-bones website
1) Create a GitHub Account
This can be done by going to Github.com and signing up to a new account
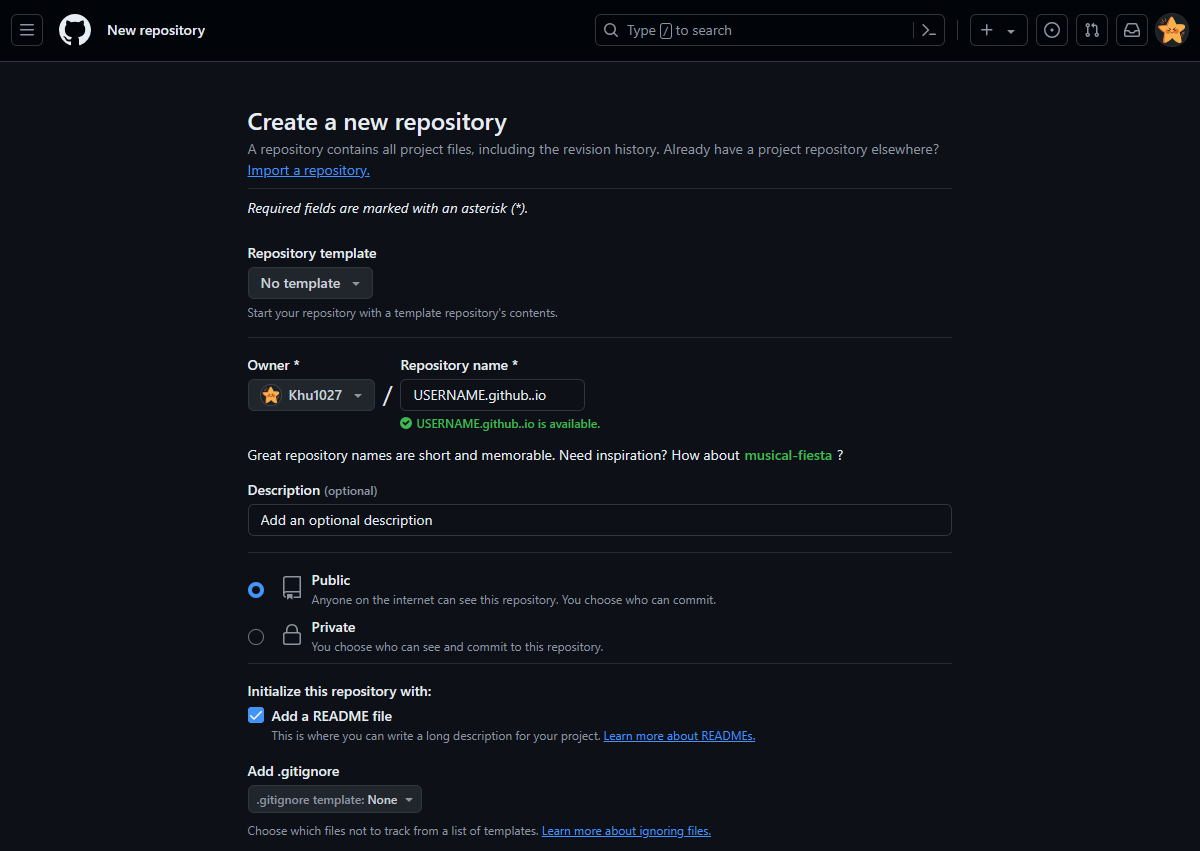
2) Create a new repository
Your repository MUST be named [YOUR_GITHUB_USERNAME].github.io. Other names will not work correctly
Once you have an account, make a new repository with the following details
- Ensure your repository is named [YOUR_GITHUB_USERNAME].github.io
- For example my username is Khu1027, so my respository would be Khu1027.github.io
- Make sure your repository is public
- You can select the option to add a README.md when creating your repo
Create your repo and commit any changes
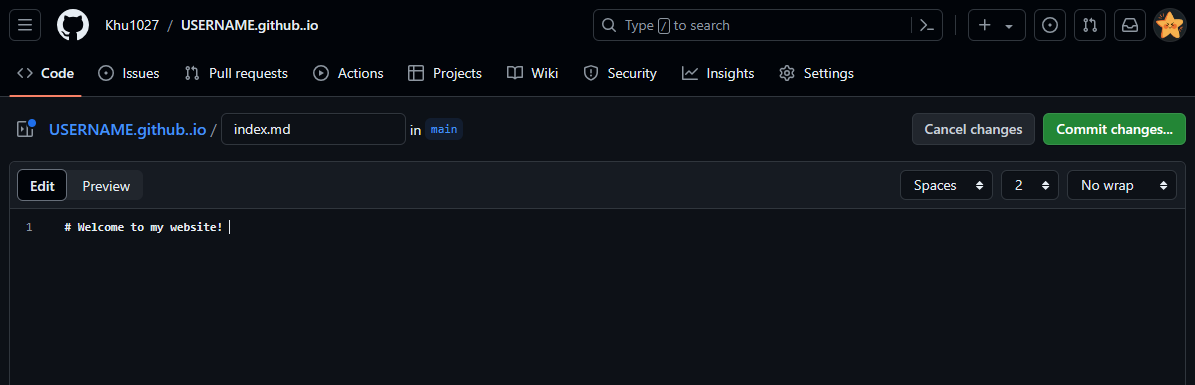
3) Add a index.html file to your repository
You can add a new file directly on your github repository
For more advanced users, you can clone the repository to your own computer and use this to add files, and commit and push changes
- Create an index.html file (or index.md file if you want to use markdown)
- Add any text/base website code that you have (this file is the first page that will be shown on your website)
- You can go back and edit/change this page to your liking at any time!
- Commit your changes
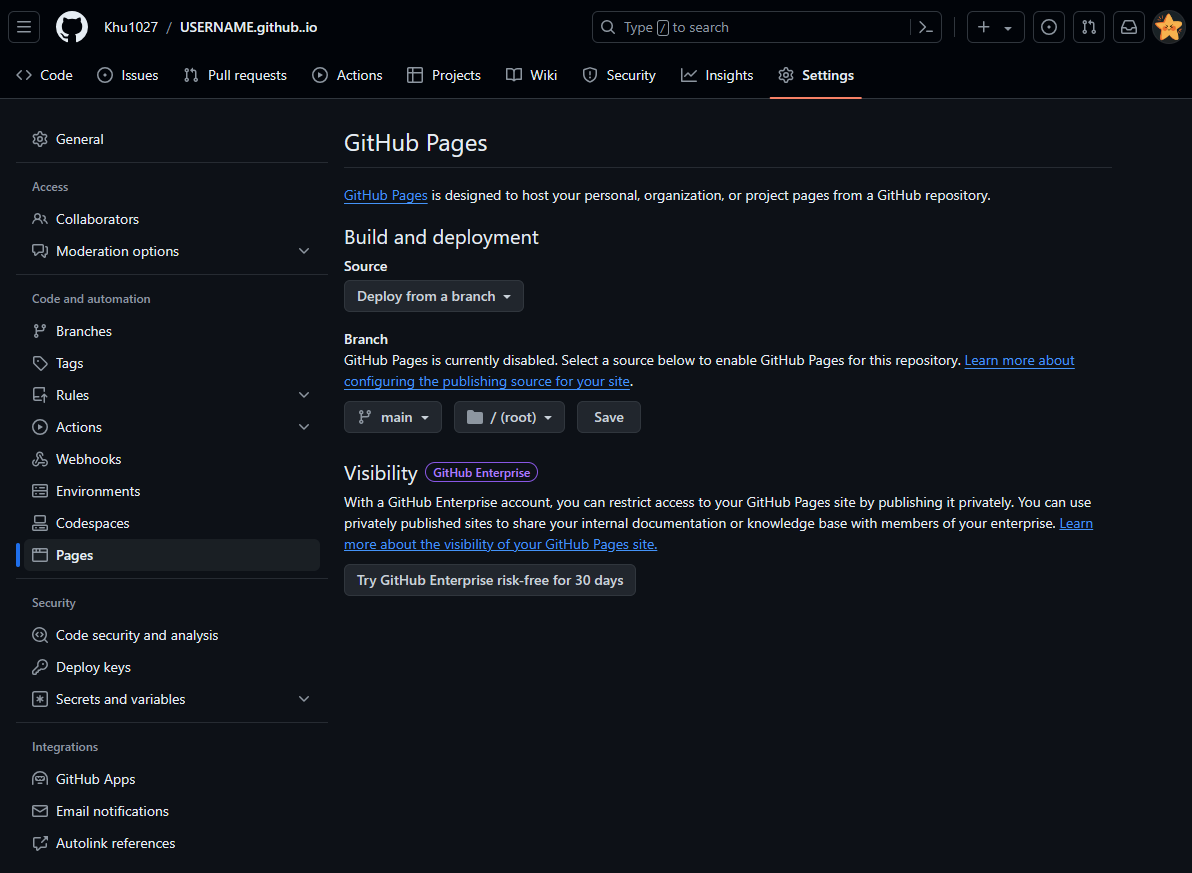
4) Edit your Repo Settings for GitHub Pages
- Click on Settings on the navbar at the top of your repo
- Click on Pages on your settings sidebar
- On Build and deployment select Deploy from a branchI
- From branch select main and then /(root) and save
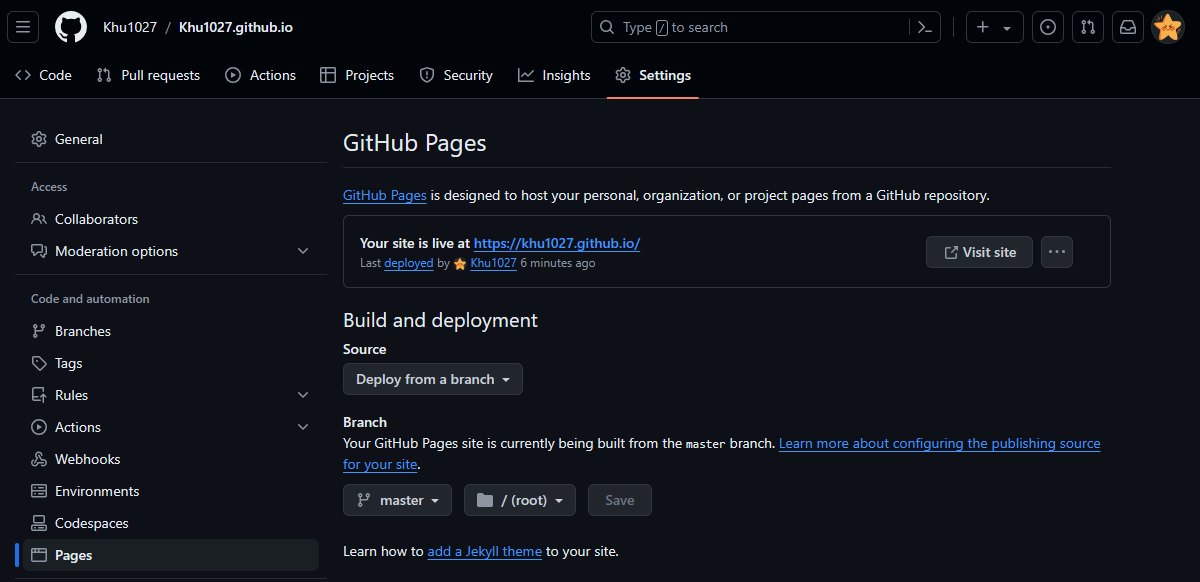
5) Congrats! You've made your website!
- You can check your website by going on your repo settings and Pages
- You should see a new area at the top of the page that says Your site is live at…
- Click on the link to see your site!
- Your website will automatically deploy whenever you push to your repo
2. Add a Jekyll theme
What is a Jekyll theme?
Jekyll is an ‘extensive theme system’ that you add to your GitHub Pages website to get a desired theme/look to your site
1) Choose a theme for your website
Jekyll has a vast array of themes which you can choose from. These include Themes supported by GitHub Pages which are very simple to add.
Or themes created by individuals that can be found on Jekyllthemes.io. My website is created using the Beautiful Jekyll theme by Daattali on GitHub.
For this tutorial, I will be demonstrating how to add the themes supported by GitHub Pages.
2) Follow the repo instructions to add the theme
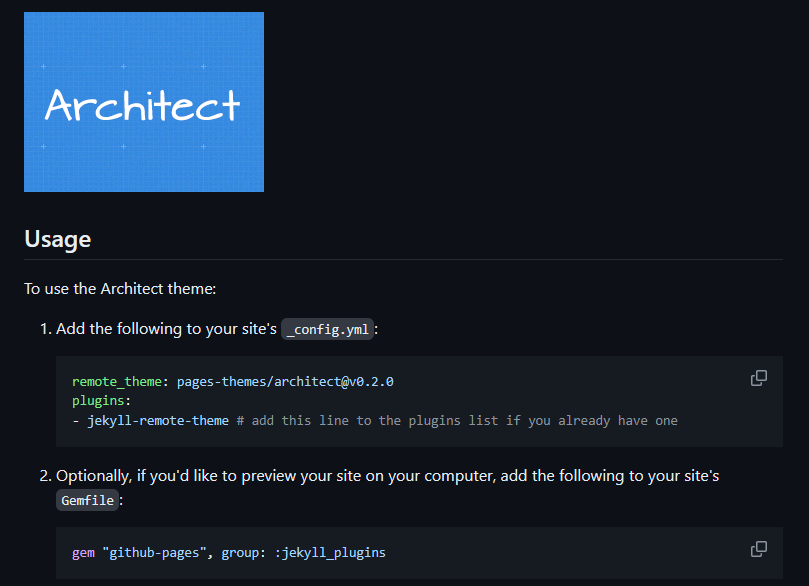
For this tutorial I will be using the Architect Theme which looks like this
Most (if not all) GitHub Pages Themes have easy-to-follow instructions to add the theme in the repository’s README
3) Create the necessary files to add the theme
Jekyll themes make use of the _config.yml configuration file to add the theme to the GitHub Pages.
If the theme requires you to add lines to your _config.yml file, and you do not have the file in your repository, simply create a new file of type _config.yml and add the code.
A Gemfile is another file you can add to your root repository, with settings to describe the gem dependencies required to run a Ruby program. In the case for the Architect Theme, the GemFile is used to change how you preview your site on your computer
Architect theme requires the following code in the _config.yml file
1
2
3
remote_theme: pages-themes/architect@v0.2.0
plugins:
- jekyll-remote-theme # add this line to the plugins list if you already have one
Architect theme requires the following code in the GemFile file
1
gem "github-pages", group: :jekyll_plugins
4) Voila! Your Site is beautified
Once you have saved/commit/pushed your changes, you’re essentially done!!
Wait until GitHub has automatically deployed your website again to see your changes
Congrats! You just made and hosted your first website!
I will link some resources that really helped me when creating my own blog. Remember! this is a barebones website, but a canvas of infinite possibility. </br> I may make another blog on how I used the Beautiful Jekyll theme and tailored it to my liking as that was a different process.
Essentially, if you want to use an existing website template, Check the repository first before making your own! Some templates may require you to fork from an existing repository or download files (meaning you will need to delete any files/your whole github.io repository)
Thank you for reading! More interesting blog posts to come I promise!
Resources
A full in-depth tutorial (much more detailed than mine TT) on GitHub Pages